
Cardboard Crafts and How to Make It
Loading...
Crafts from cardboard are not only able to reduce waste, but also have many benefits such as saving costs and sharpening creativity. Cardboard is a material that is generally used for packaging goods that are often used daily.
Most of the cardboard if left alone it will become waste. To reduce waste and protect the environment, activities to make handicrafts need to be carried out. There are lots of creative ideas that can be developed to be able to create unique and useful crafts.
List of contents
1. Cardboard Piggy Bank Craft

Making a piggy bank from cardboard can be used as an alternative to take advantage of the remaining packaging you have. With a little creativity, cardboard piggy banks can be decorated and look really pretty. This piggy bank can be placed on several sides of the house to remind you to save.
Making crafts from cardboard can provide flexibility in terms of design. Makers can be as creative as they like to make the desired craft designs.
Necessary materials
- Used cardboard
- Nail
- Ruler
- Cutter
- Pencil
- Colored shoelaces
How to make:
- Determine the size of the piggy bank according to your wishes, then start making a pattern of cardboard pieces according to the size you previously determined.
- Make a pattern on the cardboard using a pencil and ruler. Make sure the lines are still symmetrical.
- Cut the previously made pattern using scissors or a cutter.
- The next step is to make a hole on the side of the cardboard using a nail. How to make it is by first folding the piggy bank to form a cube and then seeing which side needs to be sewn using shoelaces.
- Hole the sides of the cardboard with a parallel distance
- Make sure the spacing of each hole is not close together and has the same sparseness between each hole from one another.
- The next thing you need to do is sew each side that has been successfully pierced using shoelaces.
- Remember, to start sewing from the inside so that the result looks neater.
Read: Definition of Art
2. Cardboard Stationery Holder Craft

An untidy desk can certainly make the learning atmosphere uncomfortable. In addition, the position of the stationery will be difficult to find because it is scattered. To overcome this, making crafts from cardboard for stationery can be done.
Add interesting knick-knacks to make it look beautiful. Make a partition so that stationery can be classified according to its type. To make this multipurpose container, use thick and strong cardboard to make it more durable. Determine the shape of the container you want.
Make some parts first such as for the sides, base and so on. To beautify the look, add wrapping paper with a motif that suits your taste. Add some accessories if needed.
Necessary materials
- HVS Kertas paper
- Ruler
- Scissor
- Used cardboard (choose cardboard of the appropriate thickness.)
- white glue
- Pencil
- asturo paper
- Cutter
How to make:
- The first step that needs to be done in making cardboard crafts is to prepare cardboard according to the size of the stationery box needed.
- The size to be used is 18 cm x 15 cm or can be widened to a size of 28 cm x 15 cm.
- Pieces of cardboard pieces according to the picture below.
- Cardboard pieces in the shape of the letter U will be the puller out of the resulting pencil box will look wider.
- Cut out the HVS paper with a width of 4 cm, then stick it on each side of the cardboard.
- After the HVS is glued to the cardboard to become a border, then attach each piece using adhesive glue. Each piece has 2 layers.
- After all the parts are glued to each other, then build the cardboard pieces into a pencil box from the inside.
- Glue all the parts using glue.
- Unite each piece that forms the inside with the outside of the pencil case.
- Attach the long "rail" to the inside, then insert the cardboard pieces that are shaped for formation from the outside of the cardboard.
- The next step you need to do is decorate the cardboard using asturo paper.
- Furthermore, you can add decorative paintings on each side of the cardboard to make it look more attractive.
3. Cardboard Tissue Holder Craft
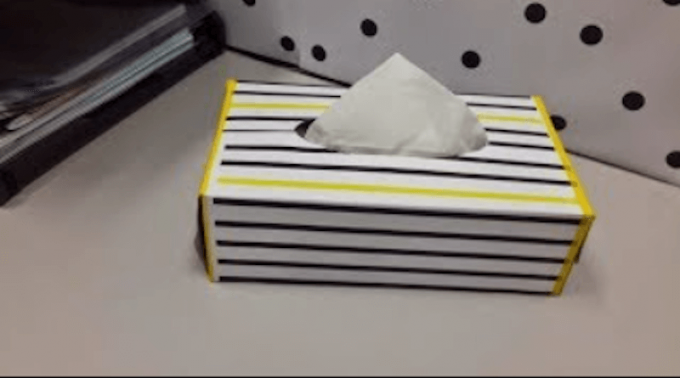
Tissues are things that are much needed in everyday life such as cleaning dirty areas, wrapping objects, and so on. Generally, when buying tissue the container is just a plastic that can be said to be quite thin.
Containers made of plastic tend to be easily torn and damaged, so it would be better if you make crafts from cardboard for tissue boxes. These containers can be placed in areas of the house such as tables, living rooms, and others.
By making it yourself, the design of the tissue holder can be adjusted according to taste. It can even be adjusted to the home design theme so that the atmosphere feels more comfortable.
Necessary materials:
- Used cardboard (choose a thick cardboard)
- Glue
- Colorful wrapping paper or folding paper
- Watercolor (optional)
- Pencil
- Ruler
- Medium size tissue
- Scissors / cutter
How to make:
- Make a cardboard craft with the length and width of the tissue box to be inserted.
- Then make a tissue box pattern like the piggy bank pattern you want to make. Use a pencil and a ruler so that the size can be determined easily. Pay attention to the top of the box and make holes so that the box can be opened and closed.
- Draw the size using a pencil so that you have a rough sketch. This makes the cutting process easier.
- Use a cutter or scissors to cut out the pre-formed pattern. Prioritize the hole in the top of the cardboard so that it is easier to take the tissue from the box made.
- Glue both sides of the cardboard using glue. Make sure each side can be glued well so that the shape of the tissue box can be obtained perfectly.
- Pay attention to the hole again, whether it is comfortable to use to take tissue or not.
- Decorate the freshly made tissue box using colorful wrapping paper or folding paper. Other alternatives can also be used, for example using watercolors to make the design look more abstract and artistic.
Advertisement
Read: Fine Art Exhibition
4. Cardboard Cat Bed Crafts

For cat lovers, of course, they want the most comfortable place for their pets. Try replacing the usual cage purchased from the pet store with a cardboard cat house that you make yourself.
Besides being easy to make, making cat bed crafts from cardboard can provide fun and also save costs. Shapes, sizes, and decorations can be adjusted according to individual wishes.
A cat house can be made using one large cardboard or assembling two small boxes. Don't forget to make holes so the cat can comfortably get in, out and play.
Necessary materials:
- Cardboard used shoes that are still intact (choose a box)
- Decoration (you can choose your own according to taste)
- Small blanket (not too thick or thin)
- Superglue glue
- Scissors/cutters
- Wrapping paper
How to make:
- The first step that needs to be done is to measure the size of the mattress that will be made for the cat. Adjust the size of the cat to the bed that will be made. That way the cat can rest more comfortably.
- Cut out the front of the cardboard so it can be used as a door for the cat. Make a pattern first then cut it out.
- Also make a pattern for the sides so that the shape is not too stiff.
- In order not to look too plain, decorate the bed by using wrapping paper with the desired pattern or pattern. Add the cat's name on the front to make it look more personal.
- Choose a blanket with sufficient thickness. Cats will feel hot faster if the blanket is too thick. In addition, thick blankets can also increase the risk of shortness of breath in cats.
- If you have chosen the appropriate blanket, place it on the inside of the bed as a base. The softness of the material also needs to be considered so that it feels comfortable.
5. Cardboard Bookshelf Crafts

Crafts using cardboard are quite varied. There are several ideas that can be applied to make useful crafts, one of which is to make a bookshelf. The large number of books makes it difficult to store them.
Generally, bookcases are made using wood, but they are not cheap. To save costs, use cardboard to make beautiful minimalist bookshelves. The materials needed are very easy to find.
However, it should be noted, because the weight of the book is quite heavy, you must use cardboard that has the appropriate thickness. This is done so that the benefits of the bookshelf can be felt optimally and durable.
Necessary materials:
- iron clip (optional)
- paper barrel or cutter
- Thick cardboard
- Pencil
- Color Stickers
- Cardboard glue (use the one with the strongest adhesion).
- Ruler
How to make:
- Make the shelf pattern as desired, from the top, bottom, to the small shelves. Try to measure the width and length to match having the right size.
- Draw a pattern using a pencil so that when it is wrong it can be corrected again. Make a large number of patterns for the layers of each section.
- If the pattern is ready, please start cutting the cardboard. Do it slowly so that the results can be neat and easier to install.
- Cut each piece one by one then collect. Cover the pieces with stickers to make them look interesting. To make it look beautiful, please color the shelf pieces with paint.
- When you're done decorating each piece, thicken the cardboard by attaching several of the same shapes using glue. This needs to be done so that the shelf can be strong and not easily broken.
- Glue the cardboard layer slowly until it feels thick and sturdy.
- Assemble all the cardboard sections that have been cut and thickened previously. Attach each corner of the bulkhead with iron clips so that it looks neater and more sturdy.
- Complete each section and make sure nothing is missed. If it is finished, please use it directly as a shelf.
Read: Art Critic
6. Cardboard Table Craft
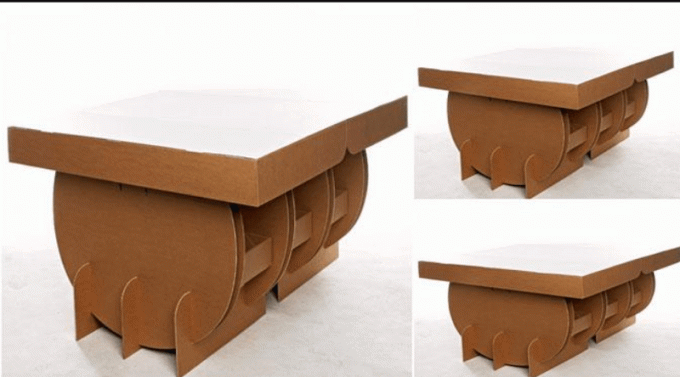
The table is an object that is needed to put things. If buying a table isn't cheap, try making your own. The materials needed are quite easy to find, namely using cardboard.
As is known, currently there are many models of tables made with various materials, such as drums, wood, tires, and so on. But there are also tables made of paper. The strength of a table made of paper is even quite good and has its own uniqueness.
For that, it never hurts to try to make a table out of cardboard. By making it yourself, creations can be done freely. The design components used can be adjusted to the taste of the maker. This of course can hone creativity so that it feels fun.
Necessary materials:
- Cardboard glue
- Pencil
- Thick cardboard
- Scissors Cutter
- Ruler
How to make:
- Prepare used cardboard that will be used. Be sure to choose cardboard of the appropriate thickness. If you don't have a thick one, feel free to layer a large amount until it feels thick.
- Draw the desired table pattern. The shape of the table made can be quite diverse, ranging from rectangular, round, and so on.
- Cut the cardboard according to the drawn pattern. If using several cardboards, glue them together to make them thick.
- Assemble all the cut patterns to form a table.
- The table made of cardboard is finished. Please add some other components so that the table looks like it has a charming design.
- Additional colors or other design components can be used to make the craft look more interesting.
- The concept of a table using cardboard can be an inspiration to make a room that is different and looks interesting. Minimalist design will radiate from the use of cardboard.
- The size of the table can be made in various ways depending on the needs of each. A unique concept can certainly become a trend.
7. Cardboard Chair Craft

If it's complete, it feels like making a table using cardboard but not making chairs. As is known, tables and chairs are a pair that is able to provide a different atmosphere. The uniqueness of cardboard chairs can be a charming and different design inspiration.
Making a chair using cardboard can be said to be not too complicated, it can even be designed according to each other's wishes. There are no limitations that need to be met to be able to make a chair design, because it can be determined by the maker himself.
This activity can provide fun and can also hone skills in making useful crafts. Utilizing cardboard for various things, indirectly has also taken care of the surrounding environment.
Necessary materials:
- Used cardboard that is quite thick
- Pencil or pen
- Glue with good adhesion
- Ruler
- Paper cutter
How to make:
- Choose a cardboard with a size that fits the chair to be made. Use thick cardboard so the chair can stand firmly.
- Draw a chair pattern to be made using a pencil and a ruler. Make a pattern as you wish, for example a sofa for one person and so on.
- Pay attention to the size of each part of the pattern so that it fits and can be installed easily.
- After the pattern is ready, cut the cardboard using a cutter.
- Cut according to the pattern and make sure you don't miss or miss it because it can change the size of the pattern that has been drawn.
- Assemble each part of the pattern to form the desired chair. The rafting process can be done in two ways, the first is to make holes and connect each part. The second way is to use glue.
- The choice of the raft method can be adjusted to the design of the chair made.
- Assemble each part one by one carefully so as not to go wrong. This of course will affect the results.
- Make sure each piece has a solid design. If it's not sturdy enough, add another layer of the same pattern so it's thicker.
- The cardboard chair is ready.
In addition to utilizing waste, making crafts from cardboard can increase imagination and creativity to be able to produce items that are useful for everyday life. Not only used alone, the crafts made can also be sold so that they can provide income.
X CLOSE
Advertisements
ADVERTISEMENT
X CLOSE