
9 Steps How to Assemble a Complete Computer with Pictures
9 Steps How to Assemble a Complete Computer with Pictures – Before we start the assembly process, we should look at each piece of hardware (including the motherboard, monitor, cd/dvd rom, printer, I/O card (if any), scanner) that we have purchased or have owned, to ensure that each hardware has been equipped with the necessary manuals and drivers. later.
list of contents
-
9 Steps How to Assemble a Complete Computer with Pictures
-
Steps to Assemble a Computer
- 1. Processor Installation
- 2. Motherboard Installation
- 3. RAM Memory Installation
- 5. Installation of VGA Card and Sound Card
- 6. Installing the Motherboard Into the Cassing
- 7. Power Supply Installation
- 8. Assembly Result Check
- 9. Steps to Fix If an Error Occurs In Assembly
- Share this:
- Related posts:
-
Steps to Assemble a Computer
9 Steps How to Assemble a Complete Computer with Pictures
Here we will discuss in detail how to assemble the correct computer complete with pictures.
Steps to Assemble a Computer
Here are the steps that should be considered in assembling a computer, including:
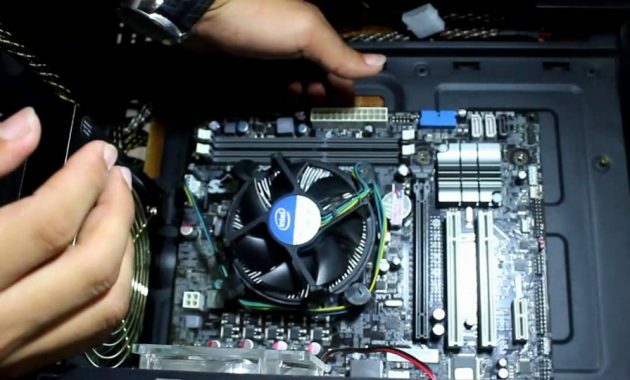
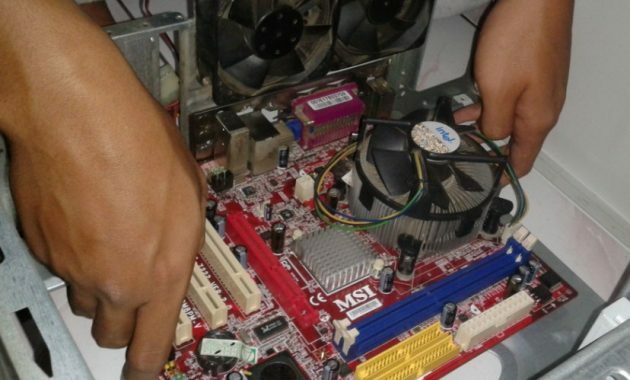
1. Processor Installation
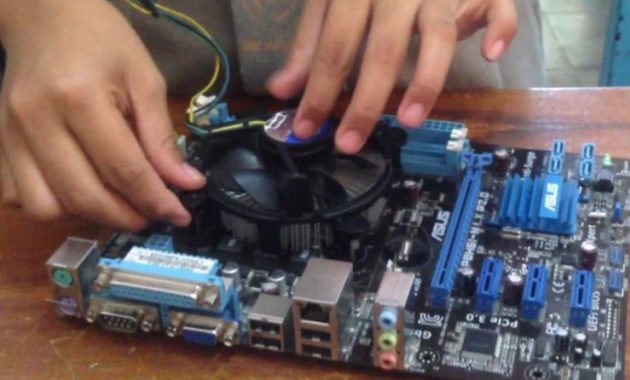
Install the processor according to its place (socket), pay attention to the sign on the processor must be placed according to the sign on the socket (should not be upside down). Then lock the locking handle which is usually located on the side of the processor socket. Pay attention to the dot code on the side of the processor with an oblique shape, which is a hint that the processor part is installed in the slot that has the same sign. Then carefully read the processor manual from the manufacturer. If you are not careful or reverse install the processor can be fatal.
Then install the cooling fan on it. On certain types of motherboards, the processor socket is integrated with a special circuit board. So that the installation of the processor is enough to just attach the circuit board to the motherboard and then lock it properly. The installation of the processor in the socket or the place on the motherboard should not be reversed because it can cause the motherboard or processor to be damaged.
2. Motherboard Installation
On the motherboard, set the position jumpers connector according to the manufacturer's instructions. Unplug the plastic connector jumpers connector between the pins on the motherboard, then move the motherboard to another position connect the pins to other pins according to the recommendations written in the manual motherboards.
Usually the manual has explained the position of certain jumpers according to the type of processor that will be used. Watch carefully so that we can achieve good results. Adjust the position of the jumper with the type of processor to be installed. Adjusting the jumper position allows the motherboard to provide electricity precisely and according to the electrical needs required by the processor. If it is wrong, the processor will be damaged.
3. RAM Memory Installation

RAM memory should be installed in its place properly. Note the memory corners which are usually notched (cut out) should be placed with care. If you install it upside down, then the memory will be difficult to insert. In the type of SDRAM / DDRRAM memory, the memory holder on the motherboard has a lock that will move to lock together with the entry of memory into the holder.
4. Installation of hard disk and CD/DVD-RW
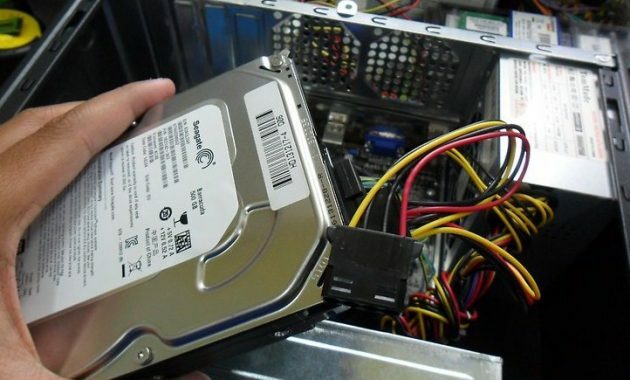
The first step in installing the hard drive and CD / DVD-RW is to put the casing in an upright position, then install the hard drive in the space provided by the casing. Then lock the hard drive with a screw using a plus screwdriver.
For CD/DVD-RW installation, install the CD/DVD-RW on the front of the casing. Then lock the CD/DVD-RW with the screw using a plus screwdriver. Then connect the special power supply cable to the power connector found on each hard drive and CD / DVD-RW.
5. Installation of VGA Card and Sound Card
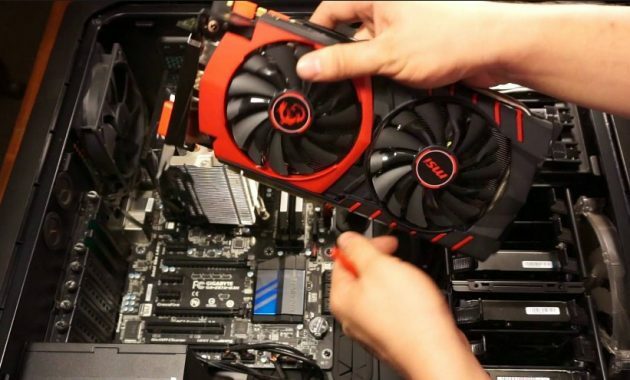
In this step, device installation is carried out if deemed necessary and according to needs. Because basically the motherboard already has VGA and Internal Sound in it. However, if it is necessary to install device In this case, you should pay attention to the slot where the VGA or Sound Card is installed carefully. Open the lock on each side of the existing slot, then VGA or Sound Card according to the existing manual. After the VGA or Sound Card is installed, lock the VGA or Sound Card hook again.
6. Installing the Motherboard Into the Cassing
Cassing (CPU protection box) is a protector and also a place where the main components that make up the CPU are placed. Previously, the motherboard was attached to a plastic hook, which is usually provided by the casing manufacturer, into the hole found on the motherboard. At an angle that allows for placing the bolts, bolt the motherboard to the casing to avoid shifting the motherboard when we move the CPU later.
7. Power Supply Installation

Install a special cable power supply (power supply) to the motherboard, usually written as P8 and P9. The black cable which the two connectors must be installed side by side. If an ATX type motherboard is used, then attach a special power supply cable for the ATX power slot on the motherboard.
8. Assembly Result Check
After the computer is assembled, it should be checked through the BIOS. Check whether all components installed on the motherboard are connected properly. Then save and exit the system BIOS. Then then install the entire Operating System that will be used, then install all the necessary drivers (both VGA, Sound, and other supporting drivers).
9. Steps to Fix If an Error Occurs In Assembly
- If the computer is turned on and the monitor does not display an image, then double check all cables connected between the monitor and the CPU.
- If you hear a 'beeep' sound, recheck the position of the RAM memory installed in the RAM socket.
- If the card is not detected, then check the card installation position again.
- If the LED light on the hard disk or CD / DVD-RW continues to light up, then check again whether the connecting connector is properly connected.
Thus the discussion about 9 Steps to Assemble a Complete Computer with Pictures, Hope it is useful.
Read also:
- 13 Tips for Choosing a Good and Correct Computer
- Understanding Motherboard: Function Types and Components
- Understanding the Processor and its Functions on a Computer (Complete)
- Computer Hardware: How it Works, Types, Examples and Functions
- Understanding VGA CARD, Functions, Types, Forms, Strengths & Disadvantages